Sunday, September 18, 2011

FNSI Results and Winners!!

Well - I suppose you were wondering if I forgot about you?! I didn't. It's been a very active weekend here in my little world. My FNSI wasn't quite as productive as I had hoped. But I did make progress and that is what matters.

Sorry about the picture quality - I used my phone. Anyway, I'm working on a diaper bag for someone in Arizona. I'm using "Lily & Will" by Bunny Hill Designs for Moda. It's adorable if you haven't seen it in person. I was pluggin along just fine until I realized I didn't have a magnetic fastener to add to the diaper bag. So I had to stop and wait until I make it to the store for a fastener.

Now for the best part - our FNSI Giveaway winners!!

The giveaway this month has a theme - Sweetwater! I am a huge fan of all their fabric and when I recently purchased their new book "Simple Home", I knew I had to give a copy away to one of you!

So I purchased an extra copy to give away, AND the best part - the ladies over at Sweetwater generously contributed some goodies to go with it.

My first winner selected using http://www.random.org/ is...

Freda - from Impera Magna - She worked on some adorable quilt squares for a quilt she is making. Freda won a copy of the new book along with a set of blank Sweetwater Notecards. (I really love these notecards and it's killing me to give them up! I'm going to check out Sweetwaters Etsy site and see if they sell them.)


Winner #2 is...

Narelle from Pins and Whiskers - She did some applique and then finished a scarf.. so cute! Narelle - I'm sending you these goodies from Sweetwater... it is a table runner pattern and 5 fat quarters from their Christmas fabric.

Congratulations winners!! Send me your mailing address and I will get these in the mail this week.

And thank you to everyone who participated! Bobbi and I love hosting the Friday Night Sew-In's and we are so happy that you all join us each month. Pin It

Thursday, September 15, 2011

First Day of School

Yep.. that First Day of School 2011 has come and gone! My boys started another school year here in Minnesota. Only this year didn't start with quite as much drama as last year. 

Mostly because we moved last Fall and I now have to drive them every day because the Big Yellow Bandit School Bus doesn't come to our house out here in the boon docks.


I can't believe how much they have grown this past year! They were excited to get back to work.. that only lasted about 3 days though.

My oldest is struggling with adjusting to full blown middle school. You know, changing classes all day long. And navagating it all alone. It's times like this that makes parenting hard because you see your kids 'suffering' and you can't do anything about it. Except tell them that it really does get easier.. and that all their friends are going through it too.

And my youngest is once again making his teacher earn every penny in her paycheck. He is a little turkey who loves to make others laugh.. aka Class Clown. Which may sound cute and funny - but it's really not. Even though it's hard not to laugh sometimes when the teacher tells us some of the things he has said. I usually kringe.. while my husband chuckles. And yes, only 8 days into the new year - we already received our first phone call from the teacher.

I'd better start planning her teacher gifts now! She deserves em!

Aaaah.. the joys of parenting.
Pin It

Wednesday, September 14, 2011

Tutorial: Nook Color Zip Pouch

First let me appologize up front to anyone who is not a Minnesota Vikings Fan - Especially you Green Bay Packer Fans, because you will have to suffer through this tutorial. But we are a Vikings family.. and the boys in this house bleed purple. 

I made this for my son so I don't have to worry about him scratching the screen of his Nook when he tosses it into his backpack.

Supplies Needed:
2 Fat Quarters (one inside and one outside. I used same for both)
scrap fabric for accent 4x4inches
1 Zipper (I used a 22in long zipper)
Fusible Interfacing (Pellon) of your choice
Thread
Zipper Foot

- If making for a Nook Color, cut as follows:
2 pieces 11x8 inches from your exterior fabric
2 pieces 11x8 inches from you interior fabric

(If making for another device, measure your device and add 3 inches to each side. Example if your device is 5 x 7, cut fabric 8 x 10)


I used the same fabric for the interior and exterior which probably wasn't the best idea for visual effects. Sorry about that.

- Cut your pellon 1/2 inch smaller than your fabric. Mine are 10 1/2 x 7 1/2 inches

- Cut your accent fabric 2 x 4 inches.

- Iron your pellon (or other fusible interfacing) to your outer fabric. The pellon I used was fusible on both sides - so I made a pellon sandwich. If your pellon is only fusible on one side, then you would fuse to your outer fabric then place your interior fabric on (WST wrong sides together) and give a 1/8 inch basting stitch all around the outside to keep your sandwich together.

- Next, grab the zipper and pull it open a few inches.

- Then trim the ends to make the zipper 1 inch shorter than the side you want the zipper to be on. Mine is the longer 11 inch side - so my zipper is trimmed to 10 inches. (You will want to trim some of both ends to make it nice and neat. Don't just cut from one end to make it 10 inches.)
- Now take your accent pieces and fold them in half, press. Now open and fold edges to the middle and press again. They will each now measure 1/2 inch x 4 inches. (Do this with both accent pieces)
- Now place at the end of your zipper and sew to create and end. Do this with both accent pieces.
- The zipper should now look like this.
- Take one 'sandwich' and pin zipper to top. Centering. Each zipper end will be 1/2 inch from fabric ends. Make sure your zipper is facing down and your exterior fabric is facing up.
- Using your zipper foot - stitch along edge with 1/4 inch seam. Now do this with the other sandwich and the other side of your zipper.

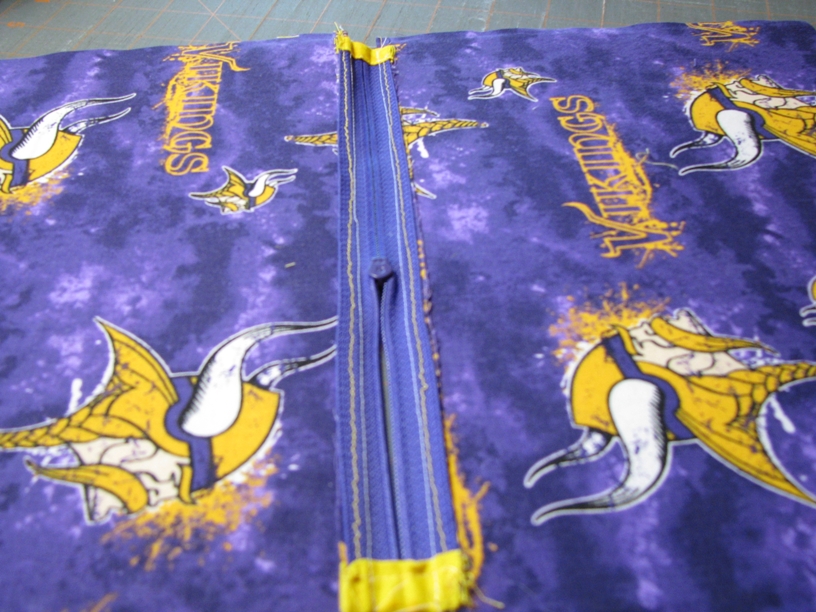
You should end up with something that looks like this. The exterior fabric is facing up in the picture below.
- Now stitch long the top (I don't have a picture of this) but it is to finish along the zipper and stitch your 1/4 seam down.)

- This picture below is what the underside looks like after the seam has been stitched down.
- Next fold in half - with your exterior fabrics facing each other and your interior fabric facing out.
- Stitch all around edges connecting both sides. I used a simple zigzag stitch to keep edges from fraying. BEFORE STARTING THIS STEP - make sure your zipper is about 1/2 way open. This is how you will turn the pouch.
- Now that you have sewed your seams all together.. it's time to turn using your zipper opening.

Whallaaah...

It's a good idea to use a heavy interfacing like Pellon 987 or similar so it gives the pouch some extra padding. But nothing too thick.

If you have any questions at all - please send me an email and I will make sure to answer them!

Enjoy!!
Pin It

Tuesday, September 13, 2011

It's that time of year again!

Yep - I've been canning. I'm not a very experienced canner - but I love doing it.

I made pickles for my husband...


And then I've made 1 batch of Apple Butter.


We picked apples from a friends house and some of them were reddish on the inside - so the Apple Butter got a little dark purple color to it. But it still tastes heavenly.

I posted the recipe for the Apple Butter last year. If you haven't made it - it's super easy and I do it in the crockpot. It makes your house smell like fall! The recipe is on my sidebar if you are interested.

Let me know if you make some, I'd love to know what you think. 
Pin It

Saturday, September 10, 2011

Sign-Up for September 16th Friday Night Sew-In

It's finally here! The time is NOW.. that's right, it's time to commit to some SEWING TIME! Sign-up for the September 16th FNSI.

I'm really excited for the FNSI this month. We have a great giveaway planned. I would share a picture - but I only have half of it at the moment.. still stalking the mailman for the other half.

So let's do this ladies!!!

Pin It