Saturday, March 27, 2010

Postage Stamp Quilt along - Tutorial part II

It's been way too long since I posted anything on the Postage Stamp Quilt along - I hope you haven't given up yet.

The more I get done on this quilt - the more excited I get. It's a lot of work, but it does goe together very fast once you get past the cutting.

Remember as you put your strips together to make your section (or block), that you start some with dark colors on ends and some with your lighter (or white/cream) on the ends. See the difference in the blocks below?

This ensures that when you go to piece your sections together - you won't end up with all cream or all dark in the corner when the 4 corners meet. Does that make sense? I know more than one of you has asked that question - so I wanted to clarify. You can see the center where each block meets in picture below.

If you are making good progress - I would love to see them. I will have more blocks to show you next weekend.

Have fun - and let me know if you have any questions. Don't forget to post pictures to the Flickr group if you can! Pin It

Sunday, February 21, 2010

Postage Stamp Quilt-along Tutorial #1

Finally the first tutorial for the Postage Stamp Quilt-along! Yey!

And technically, there is only one true 'tutorial' for this quilt-along. Since the technique is the same throughout the entire process. But I will still be posting weekly to give you all that little push if you need it.

One correction from my original calculations - I originally said that this first tutorial would make 2 'sections' - but you could actually make 3 sections. But more on that later.

It is very important to make sure you use a 1/4 inch seam allowance. I cannot stress accuracy enough. If you are unsure - measure from your needle and mark it. Accuracy in your seam allowance makes for less frustration when matching seams later.

So let's begin.

You will start with 34 strips of light (or white/cream) and
34 strips of dark.
Each strip is 1.5 inches wide and 21 inches long.
Sort your strips into groups. You will have 4 groups total.
Group 1 / 3 = 9 strips of light & 8 strips of dark
Group 2 / 4 = 8 strips of light & 9 strips of dark

You will sew one group at a time.

Group 1 - start with a 'light' strip and sew all strips in group together. Alternating between light and dark. You will also end on a light strip.

Group 2 - start with a 'dark' strip and sew all strips in group together. Alternating between dark and light. You will also end on a dark strip.

You will end up with with two 'blocks' that look something like this.

See how Group 1 on left starts and ends on a 'light' strip. And how Group 2 on right starts and ends with a 'dark' strip?

Press all seams towards the dark strip as shown.

 
I also press from the front to make sure that they are pressed flat.

Now you will cut these into 1.5 inch strips. First trim the edge to make it straight...

Then start cutting into 1.5 inch strips. You will end up with 4 groups again that look something like this.


Now you will begin to sew them together. You can do them in any order as long as you alternate between a strip that starts with dark then one that starts with light.. and so on.

Sew 17 of them together.. pressing the seams all in one direction this time.
I like to press as I go for this step. I think it's easier to match my seams when the piece I'm working with is flat.

It will slowly start to grow..

And grow.. until you have one big block that is 17 'stamps' across and 17 'stamps' down

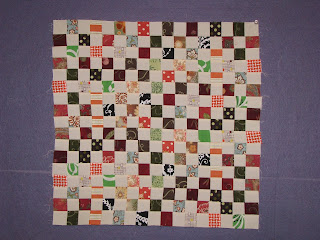
This block is what I have previously called a "section". You should have enough strips from this initial set to make 2 sections and possibly 3.

If you only make 2 - save all the remaining cut strips to use in later "sections". This will help to mix up the squares a little bit.

A Twin size quilt will need 20 sections (4 across x 5 down)
     approx 5.25 yards light and 5.25 yards dark
Queen will need 30 sections (5 across x 6 down)
     approx 7.5 yards light and 7.5 yards dark
King will need 42 sections (7 across x 6 down)
    approx 10.5 yards light and 10.5 yards
I hope all this makes sense - Please don't hesitate to ask for clarification - I will make sure to answer all of your questions! 

So.. go get sewing!
Pin It

Friday, February 5, 2010

Postage Stamp Flickr group

I was originally going to wait to start a flickr group for the Postage Stamp quilt-along until I posted the first tutorial. However, I started it now so you can ask questions in an open forum and share tips with each other and also fabrics if you would like.

The link for the Flickr group is http://www.flickr.com/groups/postagestamp/

We will be working on our quilts in "sections". As I stated in my last post, the first tutorial is posted on February 21st - and it will give instructions to make 2 sections. The fabric needs for those 2 sections are listed in this post.

Each 'section' will be 17 1/2 inches square and will contain 289 "postage stamps".

A Twin size quilt will need 20 sections (4 across x 5 down).
Queen will need 30 sections (5 across x 6 down).
King will need 42 sections (7 across x 6 down).

This may sound like alot - but trust me, this will go together quickly. And it will put a huge dent in your scrap bin!
 
Joining the Flickr group is totally optional. All tutorials will be posted here on my blog - with the first on February 21st. Pin It

Thursday, February 4, 2010

Postage Stamp Fabric needs

For the first stage of the Postage Stamp quilt along, we will be making two sections for the quilt.

For my colored squares, I will be using scraps and some fat quarters from my stash. And, because I want my quilt to look similar to the LLBean version, I will be using a solid cream color as an accent.

The fabric needs for the first stage will be as follows:

34 strips 1 1/2 x 21 inches of cream or white (3/4 yard total)
34 strips 1 1/2 x 21 inches of various colors (aka scraps or fat quarters)

If you are not planning to use white/cream as your accent. Then you will want to have 34 strips of a lighter value and 34 strips of a darker value.

You can cut these at any time. I will post the first tutorial on February 21st.

And finally - on a totally different topic. I stopped in my local Barnes and Noble bookstore this morning and found this book on the bargain table. It's actually pretty good. It has quite a few quilt blocks inside along with some good tips. And a bargain at $9.98

My store had quite a few copies.. you should check yours and see if they have it. I may go get another copy for the Friday Night Sew-in giveaway. Pin It

Wednesday, January 27, 2010

More Postage Stamp Quilt-Along details


Ok, now that I know quite a few of you are interested in the Postage Stamp Quilt-Along, I will give a few additional details.

Like I said - this is meant to be a scraps buster - but it doesn't have to be.

The pieces of fabric that we will be working with will be 1 1/2 x 21 inches. So keep that in mind as you dig through your scraps for fabrics to use.

The 1 1/2 x 21 inch size also means that this is a great project to use some Fat Quarters up. So if you have some in your stash that you want to use.. dig those out too.

Using the white or cream between each color square is totally optional. This would be a gorgeous quilt without the white or cream.
I also want to stress how easy this is going to be - I think you will all be amazed at how fast this quilt goes together. This is a great beginner project!

When we are ready to begin - I will start a flickr group for everyone to share their progress and/or tips/ideas. Joining the flickr group is a totally optional part of the quilt-along. I won't be giving anyone "the boot" for not sharing like I've heard some other groups have done.

This is about having fun, being motivated, encouraged and to maybe learn something new while doing something that brings us joy!

I also created a button for the Quilt-Along. It is in my sidebar. You can grab it for your blog if you would like.
Pin It

Tuesday, January 26, 2010

Wait a minute Mr Postman...

Last fall I received the LLBean Home catalog and instantly fell in love with this quilt!

I have found a great way to make the postage stamp quilt using scraps WITHOUT sewing each little tiny square - I'm getting ready to start it sometime towards the end of February.

BUT - I thought I would check with all of you first and see if anyone is interested in a Postage Stamp Quilt Along? I would be posting the first one in late February.

This really wouldn't be as hard as it might look. I will include details to let you know exactly what you will need for whatever size you want to make. I will be making a KING size.. I know.. that's big!

If you are interested - leave a comment and let me know and I will be sure to get it rolling. This will be a great way to use up those scraps! Pin It