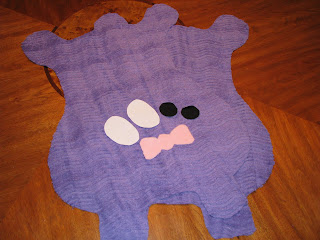
As promised - here is a tutorial for the Goofy Doll that I posted about here. The two that I made for my kids for Christmas were made out of Minky fabric. The one in this tutorial is made from Chenille. This just shows some of the many options.

Supplies Needed:
1/2 yard of fabric for body. (Chenille, Minky or Fleece)
Black and White fabric scraps for eyes and teeth
Fabric scraps for any other embellishments
Black and White cotton thread
Polyfil batting
1. Lay your 1/2 yard out with RST (right sides together). The fold is at the top.
 2. Now you will free hand draw your Goofy Doll outline. I use my favorite marking pen.. a Sharpie. It might be hard to see in the picture - but here is my outline.
 3. Cut out your Goofy Doll. Cut your eyes out of the white and black fabric. And also cut any embellishments you want at this time as well. I cut a pink bow out of Minky.
  4. First I lay out my eyes and put black thread in my machine. Then I stitch the black to the white. Use a zig zag stitch using a short stitch length. I set mine at .5.
 As you can see from picture below - I did not stitch the black on the border of the eye. You will do this when you attach to the Goofy Doll in next step.
 5. Lay out your eyes and other embellishments on the face of your Goofy Doll. Now stitch the black portion of the eye to the Goofy Doll.
 Mark where you want the ends of the mouth to be - as you can see in this photo below. Now while you still have the black thread in machine, stitch your mouth. You can make the mouth as straight or wavy as you would like.
6. Now change your thread to the White - and finish stitching the eyes in place.
 7. You can now add any shape of teeth that you would like. When I stitch the teeth on, I use a straight stitch along the top of tooth and then back to my zig zag stitch for sides of teeth.
9. With your face complete, you can now put both front and back of the Goofy Doll RST. Sew all around using a 1/2 inch seam allowance. Leave an opening at bottom between the legs for stuffing.
11. Hand stitch the opening closed.
 12. Now sit back and admire your work.. this step is important. Because once you hand it over to a happy child.. it will be cuddled, loved and carried around everywhere they go.
 12. Now sit back and admire your work.. this step is important. Because once you hand it over to a happy child.. it will be cuddled, loved and carried around everywhere they go.
If you have any questions - or if my directions aren't clear, please email me.
p.s. This purple Goofy Doll is for sale in my Etsy store.
p.s. This purple Goofy Doll is for sale in my Etsy store.


5 comments:
I'am telling you, I can see why I enjoy your blog so much. Now the goofy doll tutorial. Just so cute Heidi, really cute.
Oh i love it! i think i might have to make one or two!!! thanks
Oh I can't wait to show my grandchildren this. I hope to make one with them.
these are really cute.....
This tutorial seems easy to follow.
Post a Comment